|
The Ultimate Article Marketing, Spinning, and Submission Tool - EVER
|
Getting Started With Article Marketing RobotLet's start with a video that documents the entire process, then we'll break it down further down the page.
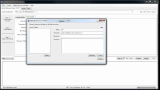
1) Step 1 - Create your Author Account There are two tabs in the Author Accounts section that you need to fill in. Step 1-A, which is your Author Account Details and Step 1-B which is your POP server configuration. The Step 1-A section has several fields in it that mimick what you would enter if you were to actually register for a typical website. In the case of article directories, most of this information can be fake. In fact it all can be fake, with the exception of:
No article directory owner will phone you or mail you something, so you can put in fake details. Also, you can use the Pre-pop button on the right to automatically fill in fake details for you. The Step 1-B section is where you put your POP (Post Office Protocol) details. This is used for AMR to download confirmation emails from your webmail server. It's also one of the most confusing parts of the software for users. AMR has an Autofill for POP accounts. This normally works most of the time in detecting your POP settings, but some hosting providers have different settings that aren't as common. The first recommendation is to attempt the Autofill and enter the password you used when you created your email account. If the "Test Pop3" succeeds, you have nothing more to do. If it fails, you will get a rather long text box with error data in it. Authentication Failed is usually the common problem. If on a cPanel account, try using the secure vs non-secure auto-fill, and if that doesn't work, in the account name, try changing the plus "+" to an at "@". 100% of the time you can access your host's online documentation or contact their support to find out what the correct pop settings should be. Also, look for Microsoft Outlook Express pop configuration settings and mimic it since that will also work for AMR. 2) Step 2- Create your Article It's not essential to do this step next. You can skip to Step 3 - Select Directories and come back to this step if you want. To create your first article in this tab, click the new button. In this guide, we'll focus on the group of panes on the right.
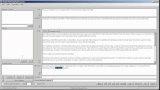
Beide the Resource box you will see some buttons. Those are meant to help easily manage your Resource Profiles. If you have a lot of articles that are all about the same thing, for example, 15 articles on Dog Toys, then you can apply the same resource box, keywords, and Categories using this function. If you need to make a change like updating a link, you can do so in the "Manage" portion and it will apply the changes across all your articles. Once you have your article entered, click OK to save it. To find out more about article spinning, and more details in general, you can view these videos:
3) Step 3 -Sign up and Confirm This process is quite straight forward but must be completed before attempting a submit, and there are some considerations to be made before proceeding.
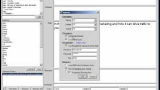
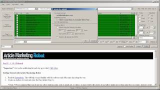
In the Step 3 tab, you will see a grid of sites. They are likely to all be in Red. This means that a sign up has not occured, or AMR failed in a previous sign up attempt. If there are zero sites in the list, click File - Re-Download Site List, then click the Refresh button (the circular looking button in the "Site List Functions") In the bottom left corner of the Step 3 tab, there is a dropdown box with the word Select. Click that, and choose All. This will tick all the check boxes in the site list. This operation applies for submit as well. Click the Sign Up button. You will see some action in the View pane below the Step 3 tab. That's it for Signing Up. Once that process completes, click the Confirm button. AMR will access your webmail (pop3) account and download the emails that were sent during the sign up process. Some emails will contain passwords. AMR will extract those passwords and store them in its database. Once the confirm process completes, you are ready to submit. Click the refresh button in the Site List Functions (circular arrow). 4) Submitting An Article This process is almost identical to Sign up and Confirm above. After the Sign Up/Confirm process, refresh your site list. Some things you will notice:
To filter the site list by just OK's, in the Status box (Step 3, top right) untick Email/None, and in the Submitted, leave all three ticked, then refresh the site list. This will show all OK sites with nothing submitted. Select all sites, and in Step 2 - Create Article, select the article you want to submit, and click the Submit button. Again, you will see action in the View pane. Once that process completes, you can click the refresh button to see the total amount of sites you have submitted to. Here is a video that will go through the process: Congratulations! You have just submitted an article! Now you can go here for more helpful instructional videos - Instructional Videos
|
© 2012 Article Marketing Robot | Privacy Policy | Terms and Conditions | Article Marketing
|